I knew that WE (Angry Husband, BFF Stacey, and me) could accomplish this project. I knew that it would not be very costly. It really wasn't complicated, but add in very busy schedules, and that's why, I'm posting the final results over a month later.
At the beginning of November, I posted my "before" photograph. This is when the project began. I started by cleaning out the closet. I took several items to the Goodwill and Salvation Army.
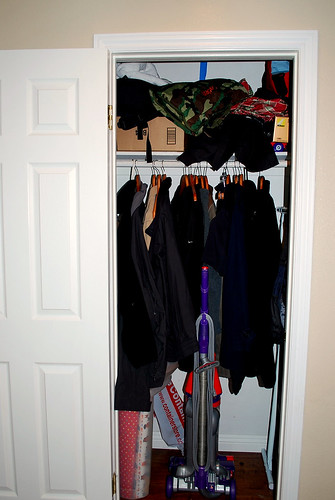
Before Picture of Closet
In mid-November, I posted some sneak previews of the paint in the closet. Stacey came over for the day and painted the closet. I'm totally allergic to paint, and doing anything creative like painting. The paint color is Valspar Jalapeño Jelly 6005-6A in semi-gloss, which is found at Lowes. We went through a gallon of paint, because the closet probably had never been painted since house was built, seriously. We took out the shelf and the bar in the closet before it was painted. We also took off the door to the closet to make it a little easier to paint.
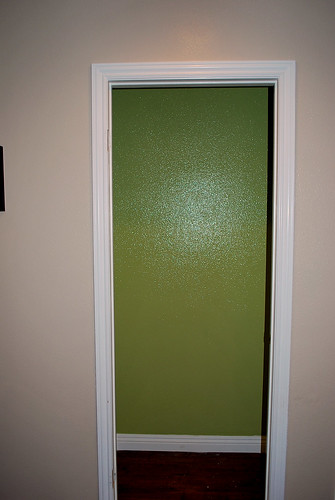
Closet After Shelf and Bar Were Removed, Plus Paint Added
I got an idea in my head, as usual. I decided that the closet needed some lighting. Do I know anything about electrical work? Umm, no..that's what Angry Husband is for. We went back and forth with all these complex ideas for electrical work in the closet. We ended up going with the simple route. He installed a recessed light in the closet ($15), and he tied (wired) it into the recessed lights in our hallway. You have to turn the hallway lighting on, to get the closet light to work. By doing this, we did not have to install lightswitches, etc...You like how I say, "We"!
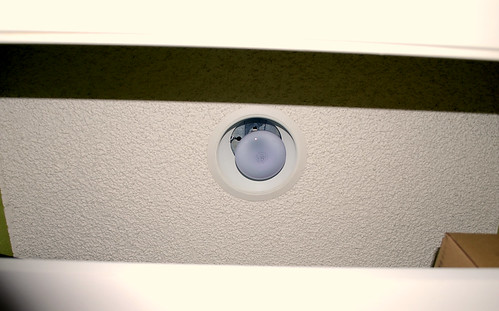
Recessed Light in Ceiling of Closet
I then made a few trips to Ikea, Home Depot, and Lowes for supplies for this project. I added my own touches to the original project from the magazine. I did use the Expedit shelf from Ikea. I looked around for other "similar" shelves, but this shelf was perfect for our closet size. Angry Husband cut out some of the molding in the closet to place the shelf unit firmly against the wall. He also secured it to the wall with mounting brackets provided with the unit when purchased.

The Closet with Expedit Shelf in Place
I found a piece of melamine at Home Depot to use for the shelf. The shelf was held up and supported by pre-primed molding also found at Home Depot. The white metal clothing rod was purchased at Lowes. It was very long and Angry Husband had to cut it to size. The clothing rod was held into place with a flange set found at Lowes. After everything was in place, Angry Husband painted the molding used to hold up the melamine shelf white (not pictured).
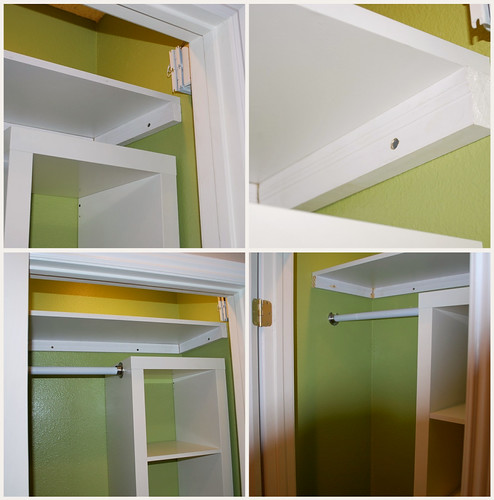
Closet After Melamine Shelf and Closet Rod Were Installed (Various Views)
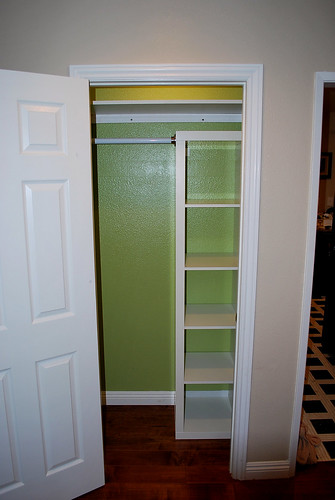
Closet After Melamine Shelf and Closet Rod Were Installed (Various Views)
I wanted to place baskets on the Expedit shelves like in the original picture. I did not like the baskets that they used. I improvised and took (3) baskets from Angry Toddler's bedroom. We are in the process of re-organizing his room and toys. He had (3) perfect wicker Medium Sabrina Baskets from Pottery Barn Kids. I will do a post later showing what I placed in the baskets. I placed our coats back in the closet. I also placed my gym bag, Angry Toddler's backpack, my camera bag, and various other items on the shelves. I still haven't decided what to put on the top shelf. I think the vacuum needs to be accessible, so it also went back into the closet.
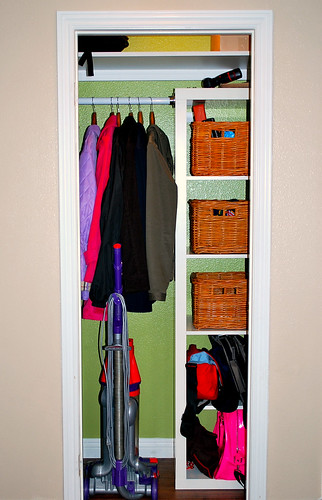
Finished Closet with All Our Stuff (Door Removed)
After the closet was pretty much finished, I had another idea...must modify, right? I wanted to add some hooks to the inside of the closet door. I'm always looking for my purse. I don't know why I'm always looking for it. I now put my purse inside the closet, when I get home. Therefore, it also prevents Angry Toddler from digging into my purse. I got the rack (hooks) from Target.
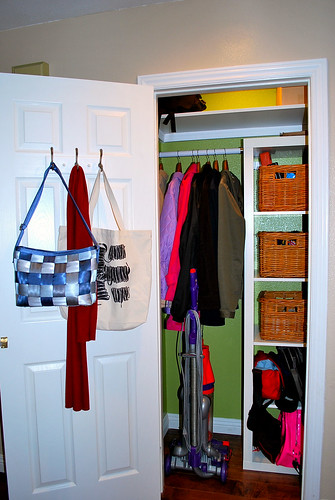
Closet with Door Back On, and Coat Rack on Interior of Door
Closet with Door Back On, and Coat Rack on Interior of Door
I hope this step-by-step process of our closet makeover helps or inspires someone. It took awhile to get it completed. I think I made a pretty good Project Manager. I'm not very handy, but I always have great ideas. Or maybe it's just the Project ADD....


Awesome job!! Looks great!!
ReplyDeleteYou did an awesome job!! It looks great. I would have never thought to put a fun color like that in a closet. It would take me at least two months to accomplish something like that. You should be very proud of your handiwork. Love the hook idea too!
ReplyDeleteYeah, mine is even worse. I think you'd have a heart attack if you saw my closet. We throw all our shoes in there as well, so the floor is littered with shoes, strollers, and everything is stuffed in there.
ReplyDeleteAwesome job! I LOVE Real Simple...such great ideas!
ReplyDeleteI so wish we had an Ikea in Hawaii! Great job Julie!
It looks great. I *wish* my closet looked as good as your before photo.
ReplyDeleteYou did such a great job! It looks nice. Love the paint, too. I never would have considered painting in a closet.
ReplyDeletethat came out GREAT! i remember that issue. what color paint did you use? i want to paint my kitchen a green color and i like that one.
ReplyDeleteWow! Nice job, that looks awesome. I need a makeover of my bedroom closet something fierce. You've given me some inspiration!
ReplyDeleteNice job!
ReplyDeleteYou did a rockin job of doing that closet over. So, tell me - how great does it feel to have everything so organized???
ReplyDeleteWOW that first picture is close to looking like our closet
ReplyDeletewooops accidently hit enter. You did a fantastic job WTG I bet it feels so much better having that done
ReplyDeleteNice job, it looks great!
ReplyDeleteHi Julie~enjoyed meeting you last night :o) I love this tutorial-very well explained with lots of photos.I need to deal with our hall closet for sure. It's probably so fun to open up now with that Jalapeno Jelly! Your seatbelt handbag adds to the charm. I used to be a flight attendant so my mother in law got me one in red-thought I would get a kick out of the theme-love it.
ReplyDeleteThat's awesome! I'm forever trying to find a solution for our shoes and coats. If we weren't in Army housing, I'd be more inclined to do a project like yours. DH says we're renting until he retires, so I'll make due for now because we'll probably only be in one house 3 years at a time.
ReplyDeletewow, girl. awesome job!
ReplyDeletelooks great! all it needs is a handy hold all ;)
ReplyDeletesimplysarahshaw.com
Looks great! LOVE the colour.
ReplyDeleteIt looks awesome - I love the color. I was thinking about that color for my boys room - it's great to see it in a real (albeit small - lol) room.
ReplyDeleteWow - that looks amazing. I'd never think to pain the inside of my closet so happy and bright! Happy Saturday Sharefest @ SITS!
ReplyDeleteLooks great! Happy SITS Saturday Sharefest!
ReplyDelete